Imagine you’re piecing together a puzzle, each part vital to see the full picture. That’s what installing Facebook Standard Events with Google Tag Manager feels like—every step is key for clear insights into your ad performance.
Today, I’m walking you through this process: from understanding why standard events are game-changers in ad tracking to creating triggers and tags that bring precision to your campaigns. By the end of our journey, you’ll be ready to unleash the power of meticulous data on every page view and lead conversion.
Stick around because by tapping into these strategies, not only will we iron out common kinks but also pave a path toward robust business growth fueled by actionable analytics.
Table of Contents:
- What Are Facebook Standard Events?
- Why Choose Standard Events Over Custom Conversions?
- Preparing to Install Facebook Standard Events
- Ensuring Google Tag Manager is Installed
- Creating Triggers in Google Tag Manager
- Setting Up an All Page Views Trigger
- Crafting a Specific Page View Trigger
- Setting Up Tags for Facebook Pixel and Standard Events
- Configuring Your FB Base Pixel Tag
- Implementing Your FB Lead Event Tag
- Utilizing Predefined Configurations from GTM’s Gallery
- Key Stats: Simplifying Setup with Templates
- A Seamless Marriage Between FB Pixels and GTM
- Publishing Without Pitfalls
- Acquiring and Inputting Your Pixel ID
- Key Stats: Pixel Prowess
- Publishing Your Changes in Google Tag Manager
- Before You Hit Publish
- A Moment That Matters
- Troubleshooting Common Installation Issues
- Issue One: Events Not Firing
- Issue Two: Inaccurate Data Reporting
- Issue Three: Duplicate Event Tracking
- Leveraging Standard Events for Business Growth
- Understanding Facebook Standard Events and Their Advantages
- Conclusion
What Are Facebook Standard Events?
Facebook has rolled out a set of eight predefined events that allow you to monitor specific actions taken by visitors on your website. From purchases made to forms filled, these events let you keep tabs without needing to code custom conversions from scratch. It’s all about getting detailed insights with minimal fuss.
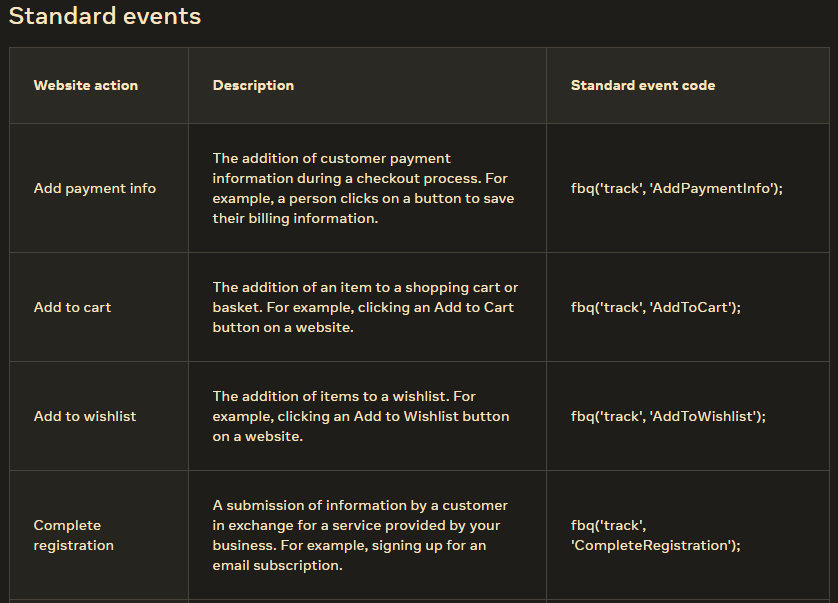
If we had to compare it, setting up standard events is akin to tuning an instrument before a concert—you want everything pitch-perfect so when it’s showtime (or in this case, ad time), you hit all the right notes with potential customers.
Why Choose Standard Events Over Custom Conversions?
You might wonder why not just stick with custom conversions? Well, picture this: standard events are like keys already cut perfectly for locks—they fit effortlessly into the complex mechanism of Facebook Ads Manager optimization algorithms. On the other hand, creating custom conversions is more like fashioning those keys yourself—it can be done but requires extra precision and effort.
The beauty lies in their simplicity and power combined; they enable advertisers to measure performance accurately, optimize delivery for campaigns targeting high-value actions, and improve retargeting strategies—all leading towards maximizing return on investment. So yes, while both have their place under the sun (or within digital marketing strategies), standard events shine brighter due mostly because they streamline processes which ultimately saves time—and who doesn’t love saving time?
Key Takeaway:
Think of Facebook Standard Events as your ad campaign’s secret agents, tracking vital user actions without the hassle of coding. They’re like pre-cut keys for ads, making optimization a breeze and saving you precious time.
Preparing to Install Facebook Standard Events
You know you need to track the right actions on your website to really nail your ad campaigns. Well, getting Facebook Standard Events up and running with Google Tag Manager (GTM) is like having a backstage pass—it lets you see all the action behind the scenes.
Ensuring Google Tag Manager is Installed
The first step is as crucial as remembering to put flour in cookies; without it, everything falls flat. Before we talk about events, make sure GTM is installed on every page of your site. This isn’t just “nice-to-have”—it’s an absolute must-do. You can quickly check if GTM code exists on your pages by using tools like Google Tag Assistant. If it’s not there yet, head over to Google Tag Manager, create an account or access yours, and follow their setup instructions.
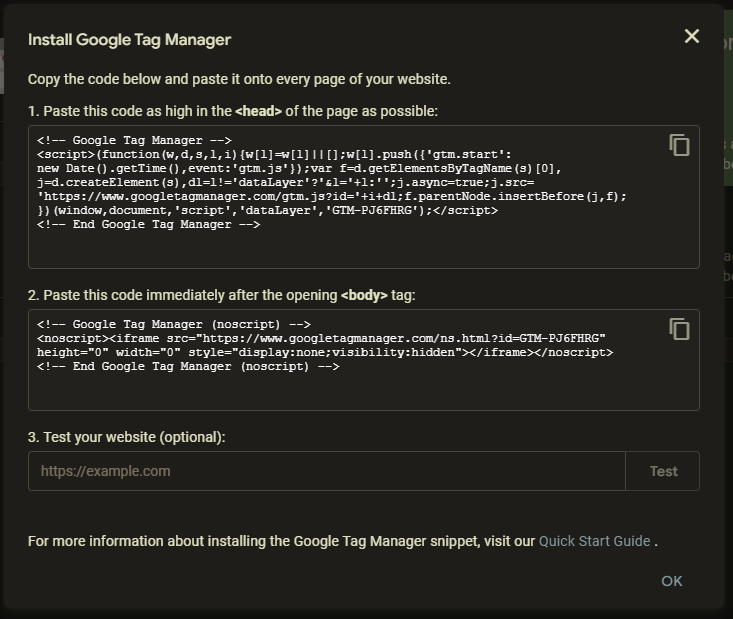
If installing code isn’t quite your jam, consider roping in a developer buddy or seeking out guides specifically tailored for this task—trust me; they’re worth their weight in gold when it comes down to troubleshooting any potential hiccups along the way.
Now that you’ve got GTM cozy and snugly fitted onto each page like a winter glove—you’re set for some real tracking magic with Facebook Standard Events.
Ready to amp up your ad game? Installing Facebook Standard Events with GTM is a must—like flour in cookies. #AdTrackingMagic
Creating Triggers in Google Tag Manager
If you’ve ever played a game of dominoes, setting up triggers in Google Tag Manager (GTM) is somewhat similar. You’re lining up your digital pieces so that when one action happens—like a page view—a chain reaction follows, sending valuable data to your Facebook Ads dashboard.
Setting Up an All Page Views Trigger
The all-page views trigger is like the grand master of triggers; it keeps an eye on every single visitor’s move across your site. It’s pretty simple to set up:
- In GTM, click ‘Triggers’ and then the ‘New’ button.
- Name this new trigger something intuitive—say, ‘All Pages View’.
- Select ‘Page View’ as the trigger type and opt for ‘All Page Views’ configuration—it’s that easy.
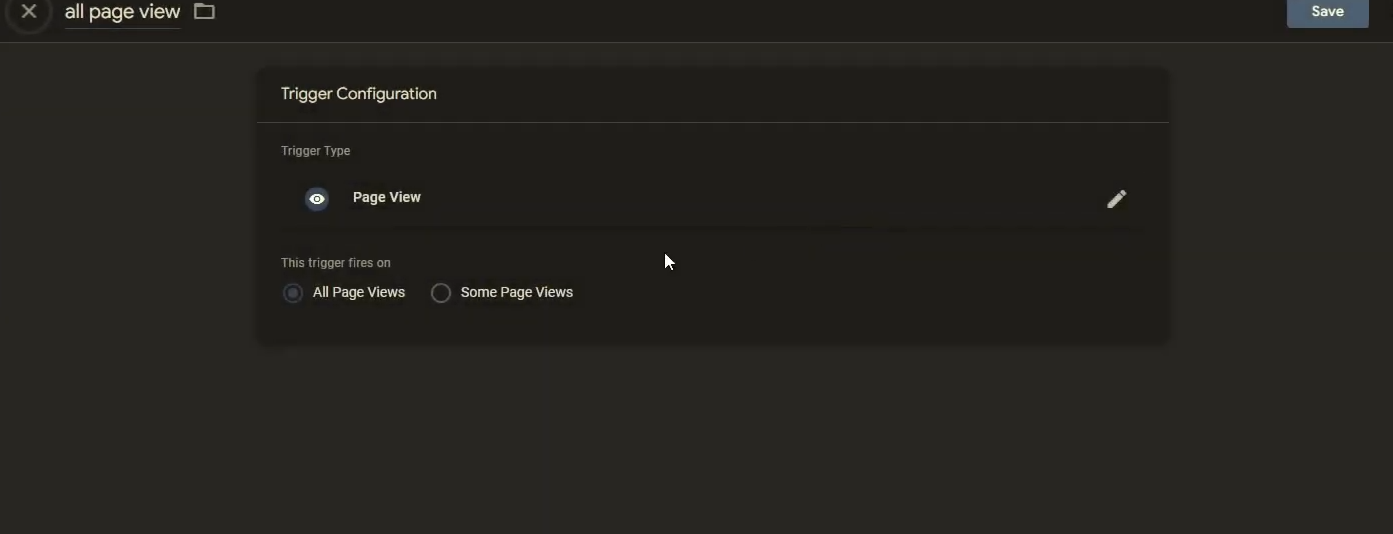
This creates one part of our two-trigger setup—the universal lookout for any eyeballs on pages. And yes, make sure you save everything before moving on or those changes will be lost into the abyss.
Crafting a Specific Page View Trigger
Sometimes though, we need precision over broad strokes. That’s where crafting specific page view triggers comes into play—for instance when someone lands on your lead magnet opt-in page. Let’s walk through how to do just that:
- Back in GTM under ‘Triggers’, hit that ‘New’ button again with gusto.
- Giving it a name such as ‘Lead Magnet Opt-In Page’, select ’Some Page Views’ this time around.
- Pick out what sets this page apart—it could be its URL or path—and specify these conditions so only views of this particular treasure chest are captured by the pixel-net we’re casting far and wide.
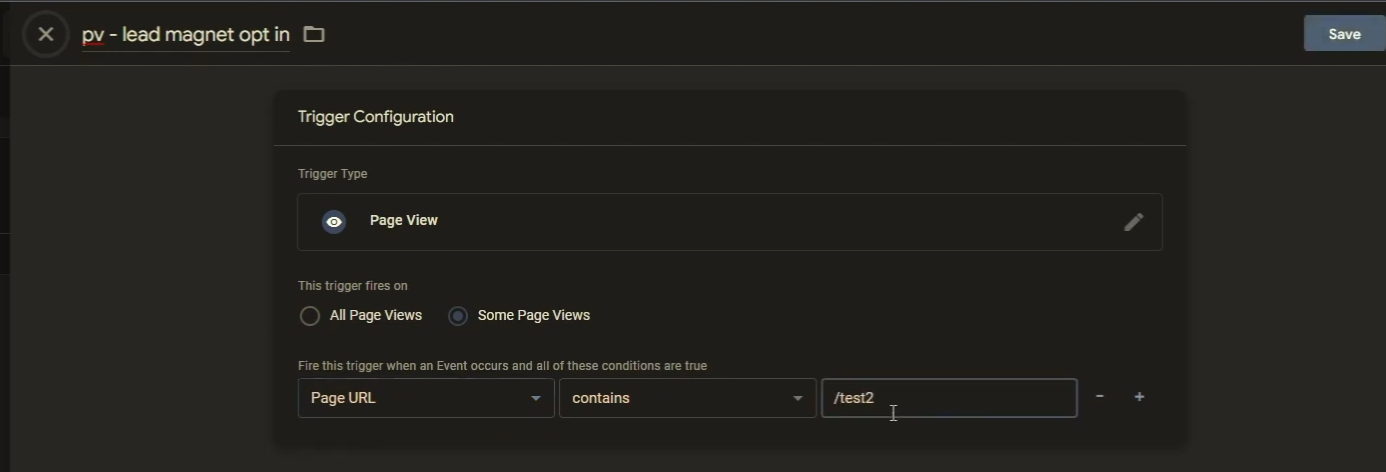
You now have two shiny new triggers—one keeping tabs everywhere and another zoomed right in where conversions are happening—or at least should be. Don’t forget to pat yourself on the back because once these are published live within GTM…you’re collecting insights like never before.
Key Takeaway:
Think of setting up triggers in GTM as playing dominoes; line them up right, and you’ll send crucial data to your Facebook dashboard with every action.
To catch all page views, just click ‘New’ under Triggers in GTM, name it ‘All Pages View’, select ‘Page View’ then ‘All Page Views’, and save. Easy.
For specific pages like a lead magnet opt-in, create another trigger named accordingly. Select ’Some Page Views’ and set the unique conditions for that page to ensure precise tracking.
Setting Up Tags for Facebook Pixel and Standard Events
If you’ve dipped your toes in the digital marketing waters, chances are you’ve heard of the mighty Facebook pixel. This little piece of code is like a spy who hangs out on your website, gathering intel that helps tailor your ads to reach the right people.
Configuring Your FB Base Pixel Tag
The first tag we’re tackling is our trusty sidekick: the FB base pixel tag. Think of it as laying down a welcome mat for all visitors across every page. To get this set up, head over to Google Tag Manager (GTM) and create a new tag—let’s call it ‘FB base pixel’. Choose the custom HTML option and paste in your unique Facebook pixel code from your ad account.
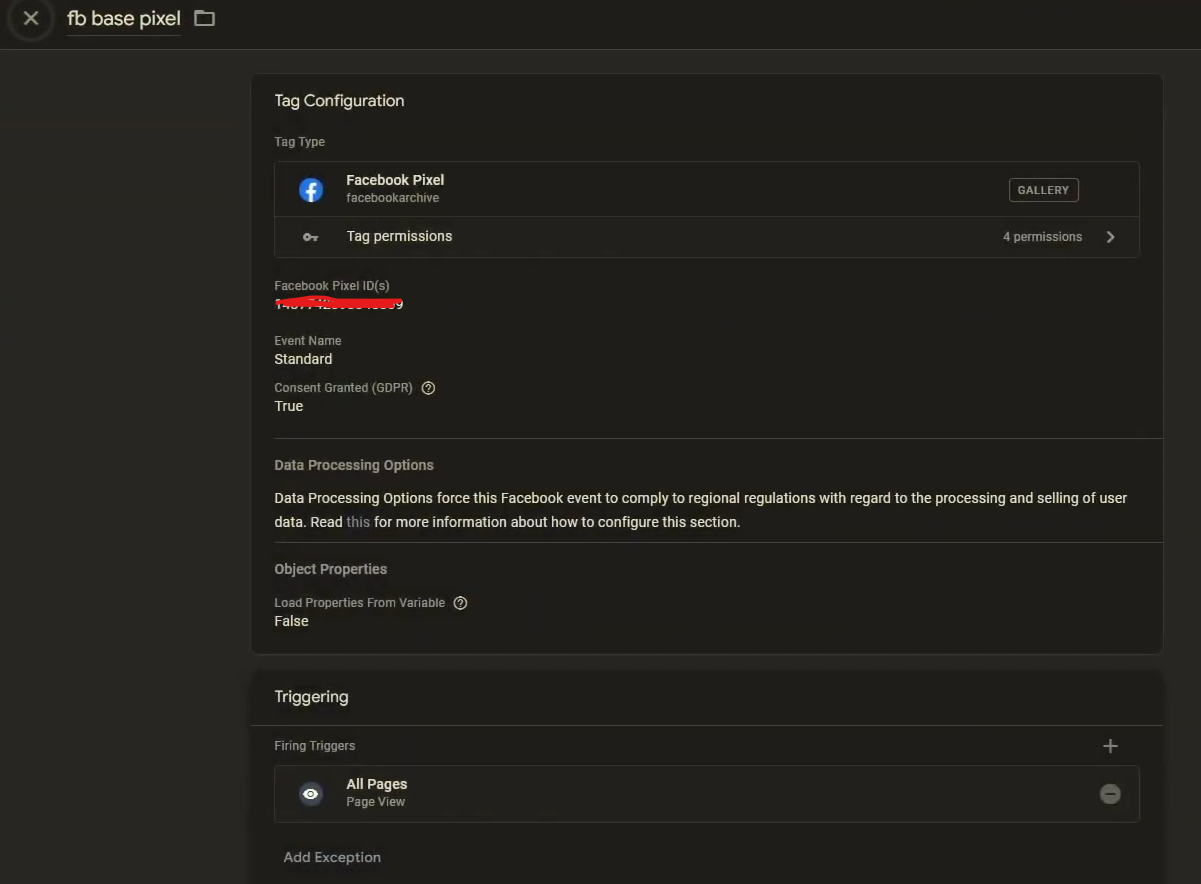
This snippet will spring into action whenever someone visits any page on your site, which means you’ll be able to track overall traffic with finesse. Before moving forward though, make sure GTM is installed correctly; otherwise, it’s like trying to bake cookies without an oven—it just won’t work.
Implementing Your FB Lead Event Tag
Moving on. Let’s say someone lands on that coveted thank-you page after signing up—a virtual high five moment for marketers everywhere. Here’s where our second hero enters: The ‘FB lead event’ tag tracks these victory moments specifically. Set up another new tag but this time select “Facebook Event” under “Tag Type”. Fill in those blanks with details about what constitutes a lead—for most cases hitting that thank-you page does indeed count.
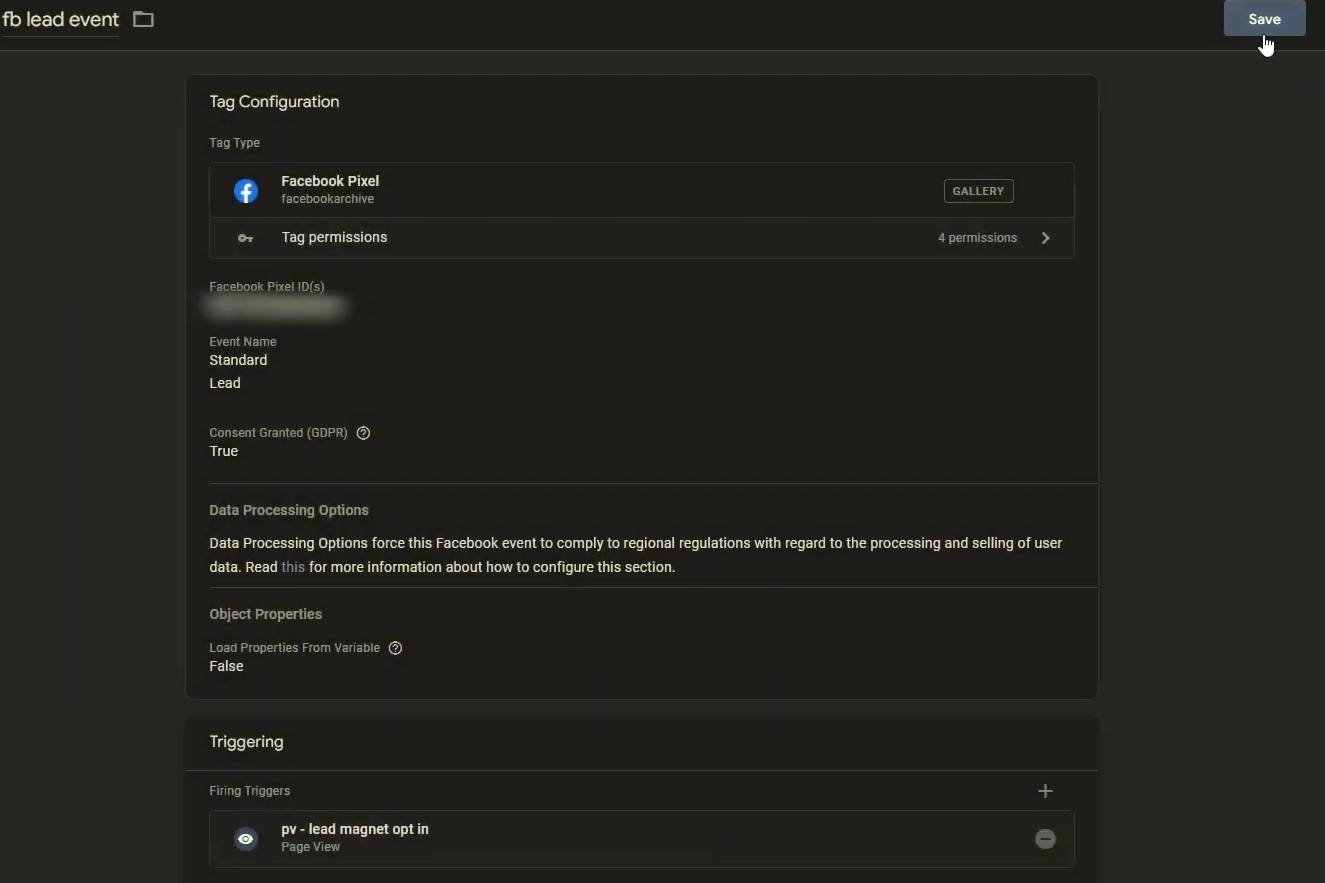
To tie everything together neatly so only successful leads trigger this celebration dance by pixels—you guessed it—we need triggers based on visiting specific pages such as said thank-you page.
All done? Don’t forget—the grand finale involves hitting publish within GTM because if not…well let’s just say no one would know about those batches of freshly baked cookies waiting inside GTM’s kitchen.
Key Takeaway:
Ready to track your website visitors and their actions? Start by setting up the Facebook base pixel tag in Google Tag Manager, then add a ‘FB lead event’ tag for tracking specific achievements like sign-ups. Just remember, hit publish on GTM when you’re done or it’s all for nothing.
Utilizing Predefined Configurations from GTM’s Gallery
Google Tag Manager (GTM) acts like a Swiss Army knife for digital marketers, especially when you’re aiming to install Facebook Standard Events without breaking a sweat. The beauty of GTM lies in its template gallery—a treasure trove of predefined configurations that streamline the tag setup process.
Key Stats: Simplifying Setup with Templates
The recommendation to use templates from GTM’s gallery isn’t just hot air; it’s about making your life easier. These pre-built solutions are akin to finding cheat codes for video games—they give you an edge, saving time and reducing errors. When it comes to deploying the Facebook pixel across your site, why reinvent the wheel when there’s already one spinning smoothly?
Say goodbye to manually cobbling together code snippets for each event. With these templates at hand, simply select the Facebook pixel configuration and customize it with your unique details—like entering a secret key into a vault full of user data gold.
A Seamless Marriage Between FB Pixels and GTM
If installing standard events were like baking cookies, using predefined configurations would be your ready-to-bake dough sitting prettily on the grocery shelf. All you need is your oven—or in this case, Google Tag Manager—and voila. You’re set up faster than saying “freshly baked pixels.”
This approach doesn’t just save time—it ensures accuracy too because let’s face it; even seasoned pros can misspell an ingredient now and then leading their cookie campaign astray.
Publishing Without Pitfalls
Once those tags are tailored within Google Tag Manager thanks to our handy-dandy gallery templates—the next step is hitting ‘publish’. But don’t rush through this stage like someone who cuts corners folding fitted sheets; make sure everything checks out first or prepare for bedlam.
Your final click releases all changes into the wilds of cyberspace where they’ll start tracking visitor interactions pronto—as long as everything has been entered correctly.
Key Takeaway:
Google Tag Manager’s template gallery is your secret weapon for easy Facebook Standard Events setup. It’s like finding a cheat code that saves you time and keeps mistakes at bay.
Using GTM templates means you can set up accurate tracking in no time—just add your details, publish with care, and watch the data roll in.
Acquiring and Inputting Your Pixel ID
If you’ve ever felt like a detective on the hunt for that elusive clue, finding your Facebook pixel ID can give you a similar thrill. But fear not, it’s no enigma. To grab this crucial piece of the puzzle, just head over to your Facebook Events Manager. Once there, click on the Pixels tab and voila. Your unique pixel ID will be staring right back at you.
Now that you have your secret code in hand, let’s get down to business with Google Tag Manager (GTM). This tool is about as handy as a Swiss Army knife when it comes to managing tags without messing with code. So make sure GTM is already part of your toolkit because we’re about to put it into action.
To start things off right within GTM, create or select an existing tag where this shiny new pixel ID will reside. Think of it as giving your pixel its own digital home where everything gets tracked neatly under one roof. In setting up the tag properties – think fast: copy-paste precision matters here – ensure ‘Tag Configuration’ is set for Facebook Pixel and paste that precious ID into the ‘Pixel ID’ field.
Key Stats: Pixel Prowess
The role of our trusty pixel cannot be overstated; without it nestled correctly in GTM’s embrace through accurate inputting, tracking could go awry faster than GPS directions during rush hour traffic chaos. Remember: each step ensures all interactions are meticulously logged – every click counts.
Cracked the code to tracking success? Got your Facebook pixel ID? Plug it into GTM and watch every click count like a pro. #MarketingMagic #PixelPower ️️
Publishing Your Changes in Google Tag Manager
So you’ve got your Facebook Standard Events all set up in Google Tag Manager (GTM), but they’re not doing much good sitting in preview mode. It’s like having a sports car with no gas; it looks pretty, but it won’t get you anywhere. Publishing is where the rubber meets the road.
The importance of this step can’t be overstated—it’s the difference between making your hard work count or watching those potential insights slip through your fingers. Imagine crafting an elaborate fireworks display and never lighting the fuse—that’s what skipping publishing would mean for your data collection efforts.
Before You Hit Publish
Making sure everything works before going live is crucial. Think of it as a dress rehearsal—checking every tag and trigger to ensure they perform flawlessly when showtime comes around. Use GTM’s built-in Preview mode to test tags on your site without affecting real-world data—a lifesaver for catching any last-minute hiccups.
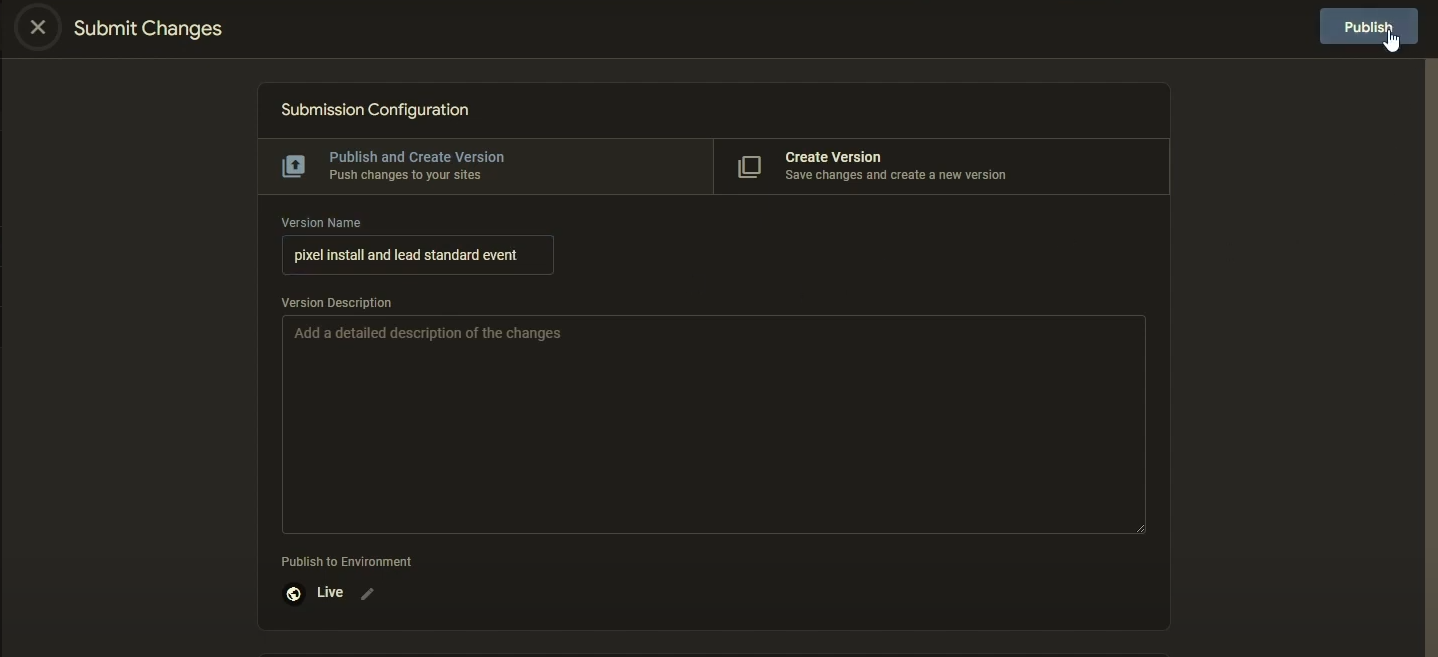
When you’re confident that everything’s running smoothly, head over to GTM’s workspace interface where there should be a clear ‘Submit’ button waiting for you at the top right corner. Clicking this begins transforming digital blueprints into tangible results.
A Moment That Matters
Filling out details about this version of changes might seem trivial, but don’t breeze past it like terms and conditions on an app update—it matters. This information serves as a changelog, creating snapshots of what was altered each time someone publishes updates within GTM—a handy reference point if things go sideways later down the line.
Giving context here saves future-you from playing detective trying to figure out which change broke something—or better yet—what brilliant tweak boosted performance so well.
Nailed your Facebook Standard Events in GTM but haven’t hit publish? It’s showtime. Test, confirm, click ‘Submit’, and make those insights work for you. #GTMwin
Troubleshooting Common Installation Issues
Picture this: you’re all set to track user actions on your site with Facebook Standard Events, but something’s off. Maybe the events aren’t firing or the data looks wonky. Don’t sweat it; these hiccups are common and fixable.
Issue One: Events Not Firing
You’ve followed every step to set up your tags in Google Tag Manager (GTM), but your events act like stubborn mules—they just won’t budge. First things first, check that trigger conditions are correct and specific enough for the event you want to track. A mismatch here is often the culprit behind non-firing events.
If everything checks out there, make sure you’ve published changes in GTM because even a tiny oversight can leave your setup incomplete—like leaving home without keys.
Issue Two: Inaccurate Data Reporting
Facing weird numbers in reports? Start by confirming that each standard event has its own unique tag configuration within GTM—it’s easy to get wires crossed when setting up multiple tags at once. Also verify that you have inputted your pixel ID correctly. It should be as precise as a secret agent’s identity—if it’s not exact, expect some mix-ups in reporting back at headquarters.
Issue Three: Duplicate Event Tracking
Sometimes eagerness leads to double-tapping—an issue where one action triggers duplicate events. This can inflate your data faster than blowing up balloons at a party. Check for redundant triggers or overlapping tag rules which could cause an event equivalent to déjà vu.
Avoid these issues by giving each trigger and tag pairing clear boundaries—think of them like office cubicles where everyone knows their own space.
Remember, patience is key when troubleshooting tech tangles with tools like GTM—you’ll unravel those knots soon enough.
Key Takeaway:
Hit a snag with Facebook Standard Events not firing or weird data? Double-check your GTM trigger conditions, publish changes, and confirm unique tags for each event. And hey, don’t let duplicate tracking inflate your data—keep those triggers separate like office cubicles.
Leveraging Standard Events for Business Growth
Imagine you’re a chef. Your restaurant is your website, and the meals are the user interactions on it. Facebook Standard Events are like your secret recipes that let you know exactly what dish was ordered, how many times, and whether customers asked for seconds.
To truly harness these events for growth, think of them as more than data points; they’re insights into customer behavior. With proper installation using Google Tag Manager (GTM), each standard event can be tracked — from page views to purchases — providing a goldmine of information to optimize ad campaigns effectively.
Understanding Facebook Standard Events and Their Advantages
The role of Facebook Standard Events in ad tracking is akin to placing sensors at every corner of your store. These predefined actions by Facebook allow advertisers to monitor specific activities such as ‘Add to Cart’, ‘Purchase’, or ‘Lead’. Unlike custom conversions that require manual setup for each action you want to track, standard events offer ease with ready-to-use options tailored for common business goals.
This makes them beneficial not just because they save time but also due to their seamless integration with the optimization algorithms on both Facebook and Instagram Ads platforms. By leveraging these pre-set events accurately through GTM’s dynamic tagging capabilities, businesses gain access to richer analytics that can fine-tune targeting strategies and improve return on investment (ROI).
Just as you wouldn’t start cooking without making sure all the ingredients are ready; before installing standard events via GTM, you need to ensure everything’s in place – starting with GTM itself being correctly set up on your site – an absolute prerequisite.
Boost your ad game with Facebook Standard Events via GTM. Track user actions like a pro, optimize campaigns and cook up increased ROI. #FacebookAds #GrowthHacking
Conclusion
So, you’ve mastered how to install Facebook Standard Events with Google Tag Manager. You now know the why and the how of tracking like a pro.
Dive in, set up those triggers for page views. Configure your tags; make them work hard for every lead. Remember, precision is key.
Publish those changes! Because without hitting ‘live’, it’s all just practice runs. Troubleshoot if you hit snags; there’s always a fix.
Use this knowledge well because these insights are gold dust for growth-hungry businesses ready to scale smartly.
